If you want to get method names of a given type in C#, you can use method Type.GetMethods. This method returns array of MethodInfo objects. MethodInfo contains many informations about the method and of course a method name (MethodInfo.Name). To filter returned methods (for example if you want to get only public static methods) use BindingFlags parameter when calling GetMethods method. Required are at least two flags, one from Public/NonPublic and one of Instance/Static flags. Of course you can use all four flags and also DeclaredOnly and FlattenHierarchy. BindingFlags enumeration and MethodInfo class are declared in System.Reflection namespace.
This example gets names of public static methods of MyClass, sorts them by name and writes them to console.
[C#]
using System.Reflection;
// get all public static methods of MyClass type
MethodInfo[] methodInfos = typeof(MyClass).GetMethods(BindingFlags.Public |
BindingFlags.Static);
// sort methods by name
Array.Sort(methodInfos,
delegate(MethodInfo methodInfo1, MethodInfo methodInfo2)
{ return methodInfo1.Name.CompareTo(methodInfo2.Name); });
// write method names
foreach (MethodInfo methodInfo in methodInfos)
{
Console.WriteLine(methodInfo.Name);
}
Saturday, 3 July 2010
Database Terms
* Aggregation - Objects that are composed of other objects.
* Concurrency - Databases must ensure that data is checked when concurrent access is allowed. Concurrent access means more than one application or thread may be reading or updating the same data at the same time.
* Database Garbage Collection - Garbage collection is the process of destroying objects that are no longer referenced, and freeing the resources those objects used. In Java there is a background process that performs garbage collection. Requires bi-directional object relationships. Determines if the database performs garbage collection on objects that are no longer referenced by the database. This keeps external programs from having to track the use of object pointers.
* DBMS - Database management system.
* Distributed Architecture - Object are sharing in a distributed environment or the entire database may be replicated on multiple computers.
* DML - Data Manipulation Language separate from programming languages (for RDBMS) and used as a means of getting and storing data in the database.
* Encapsulation - Data with method storage. Not all databases support the methods but rely upon the classes defined in the schema to reconstruct the object with its methods.
* Fault tolerance - Features that provide for fault tolerence in the event of a hardware of software failure. Normally transaction processing provides software fault tolerance. Data replication to other servers on the network supports hardware fault tolerance.
* Heterogeneous environment - Cross Platform support - The database may be able to run on various builds of computers and with various operating systems.
* Inheritance - Objects inherit attributes from parent objects.
* JDBC - An application program interface (API). Calls are used to execute SQL operations.
* normalized - Elimination of redundancy in databases so that all columns depend on a primary key.
* Notification - Notification may be active or passive. A passive system can minimally determine if an object has changed state. An active system may provide for an application to be informed when an object is modified.
* Object relationships - Object relationships define association with other objects, and whether objects can detect each other in one direction or two directions. Two way object relationships may allow for garbage collection.
* ODBMS - Object Database management system.
* OQL - Object Query Language, is a data manipulation language for Object Databases although many object databases do not support it. They rely on object class extensions or interfaces for their support.
* Persistence - Databases provide persistance which for object databases means object can be stored between database runs.
* RDBMS - Relational database management system.
* Schema - The data structure of the database.
* SQL - Structured Query Language is a standard language for communication with a relational database management system (RDBMS). Structured Query Language, is a data manipulation language which is a standard for getting and storing data in an RDBMS.
* SQLJ - Supports structured query language (SQL) calls for Java. It consists of a language allowing SQL statements to be embedded in it, a translator, and a runtime model.
* Transaction processing - Some databases may have some form of transaction processing which may support concurrency. Transaction processing will ensure that the entire transaction is made or none of it is made. Transactions support concurrency and data recovery. A data failure will cause a rollback of data.
Object Oriented Databases
Object oriented databases are also called Object Database Management Systems (ODBMS). Object databases store objects rather than data such as integers, strings or real numbers. Objects are used in object oriented languages such as Smalltalk, C++, Java, and others. Objects basically consist of the following:
* Attributes - Attributes are data which defines the characteristics of an object. This data may be simple such as integers, strings, and real numbers or it may be a reference to a complex object.
* Methods - Methods define the behavior of an object and are what was formally called procedures or functions.
Therefore objects contain both executable code and data. There are other characteristics of objects such as whether methods or data can be accessed from outside the object. We don't consider this here, to keep the definition simple and to apply it to what an object database is. One other term worth mentioning is classes. Classes are used in object oriented programming to define the data and methods the object will contain. The class is like a template to the object. The class does not itself contain data or methods but defines the data and methods contained in the object. The class is used to create (instantiate) the object. Classes may be used in object databases to recreate parts of the object that may not actually be stored in the database. Methods may not be stored in the database and may be recreated by using a class.
Comparison to Relational Databases
Relational databases store data in tables that are two dimensional. The tables have rows and columns. Relational database tables are "normalized" so data is not repeated more often than necessary. All table columns depend on a primary key (a unique value in the column) to identify the column. Once the specific column is identified, data from one or more rows associated with that column may be obtained or changed.
To put objects into relational databases, they must be described in terms of simple string, integer, or real number data. For instance in the case of an airplane. The wing may be placed in one table with rows and columns describing its dimensions and characteristics. The fusalage may be in another table, the propeller in another table, tires, and so on.
Breaking complex information out into simple data takes time and is labor intensive. Code must be written to accomplish this task.
Object Persistence
With traditional databases, data manipulated by the application is transient and data in the database is persisted (Stored on a permanent storage device). In object databases, the application can manipulate both transient and persisted data.
When to Use Object Databases
Object databases should be used when there is complex data and/or complex data relationships. This includes a many to many object relationship. Object databases should not be used when there would be few join tables and there are large volumes of simple transactional data.
Object databases work well with:
* CAS Applications (CASE-computer aided software engineering, CAD-computer aided design, CAM-computer aided manufacture)
* Multimedia Applications
* Object projects that change over time.
* Commerce
Object Database Advantages over RDBMS
* Objects don't require assembly and disassembly saving coding time and execution time to assemble or disassemble objects.
* Reduced paging
* Easier navigation
* Better concurrency control - A hierarchy of objects may be locked.
* Data model is based on the real world.
* Works well for distributed architectures.
* Less code required when applications are object oriented.
Object Database Disadvantages compared to RDBMS
* Lower efficiency when data is simple and relationships are simple.
* Relational tables are simpler.
* Late binding may slow access speed.
* More user tools exist for RDBMS.
* Standards for RDBMS are more stable.
* Support for RDBMS is more certain and change is less likely to be required.
ODBMS Standards
* Object Data Management Group
* Object Database Standard ODM6.2.0
* Object Query Language
* OQL support of SQL92
How Data is Stored
Two basic methods are used to store objects by different database vendors.
* Each object has a unique ID and is defined as a subclass of a base class, using inheritance to determine attributes.
* Virtual memory mapping is used for object storage and management.
Data transfers are either done on a per object basis or on a per page (normally 4K) basis.
Stupid C# tricks: Working with indexers
One of C#'s most interesting features is the class indexer. Simply put, an indexer is a special kind of property that allows you to reference your class like you would an array. Obviously, this ability becomes useful when creating a collection class, but giving a class array-like behavior can be useful in other situations, such as when dealing with a large file or abstracting a set of finite resources. In this article, I'll show you how to set up a class to use an indexer. But first, let's get some necessary background by reviewing the concept of properties.
Properties 101
If you've done any programming in VB6, you'll be familiar with property methods—special class members that allow controlled access to a private class field. In C#, you have two kinds of properties: get, which allows you to return the value of a private field, and set, which allows you to set the value of a private field. As a simple example, consider the code below, which creates a FirstName property to control access to the private class member firstname:
class Person {
private string firstname;
public string FirstName {
get {return firstname;}
set {firstname = value;}
}
}
That property declaration would allow you to write code like this:
Person p = new Person();
p.FirstName = "Lamont";
Console.WriteLine (p.FirstName);
As you can see, a property declaration looks a lot like a field declaration, except that it's declared with two special members, called accessors in Microsoft parlance. The get accessor is called when the property is invoked on the right-hand side of an expression or used as a parameter to another routine. The set accessor is called when the property is invoked on the left-hand side of an expression and sets the value of its associated private field via the implicitly passed value parameter. You'd create a read-only property by omitting the set accessor, which would cause any attempts to set the property to generate compiler errors.
Using indexers for fun and profit
So why did I launch myself on that tangent? Because a class indexer works almost exactly like a property and looks very similar when you examine the code. Here's a sample class with an indexer that returns a string:
class Sample {
public string this [int index] {
get {return "You passed " + index; }
)
}
Notice that the property name is this, which refers back to the current instance of the class, and that the parameter list is enclosed in square brackets instead of parentheses. Also, this is a read-only indexer. To make it read/write, I'd have to add a set accessor. When defining an indexer, you are not limited to a single parameter. Indexer parameters may be of any type, although int usually makes the most sense. It's also possible to have more than one indexer in the same class (overloading)—more on that later.
Having defined Sample in this way, we can use the indexer as a sort of default property, like so:
Sample s = new Sample();
Console.WriteLine(s[55]);
Properties vs. indexers
There are a few differences between properties and indexers. Essentially, they boil down to the following:
* Each property in a class must have a unique name, while each indexer defined in a class must have a unique signature or parameter list. (This allows indexer overloading.)
* Properties can be static, while indexers must always be instance members.
* Accessors defined for an indexer can access parameters passed to the indexer, while property accessors have no parameters.
Advanced tricks: Interfaces
When array-like behavior is desired for an implementer, you can define indexers for interfaces. In fact, the IList and IDictionary collection interfaces both declare an indexer to provide access to the items they're storing.
When declaring an indexer for an interface, remember that the declaration just serves to indicate the existence of the indexer. You need only provide the appropriate accessors and should not include a scope modifier. The following is an example of an indexer declared as part of an interface appropriately named
IImplementMe:
interface IImplementMe {
string this[int index]
{
get;
set;
}
An implementing class would have to provide the implementations for both the get and set accessors for IImplementMe's indexer.
That'll about do it for now. You should have a strong enough understanding of indexers to play with them on your own. Have fun.
Visual Studio: Turn on line numbering
Many development tools—e.g. FxCop—refer to source code line numbers. Visual Studio .NET always shows the current line number, but finding a particular line called out by a tool is simpler if source code line numbering is enabled.
[edit]
Change Visual Studio Options
The grid layout settings are found on the Visual Studio 2005 Options dialog box. To access the Options dialog box, select the Tools / Options… menus. It is the same in the Visual Studio Express Editions.
[edit]
Check Line numbers
* Expand the Text Editor item in the left panel of the Options dialog box.
* Select the C# item.
* Enable source code line numbering by checking the Line numbers checkbox in the Display section of the right panel. Click the OK button and voilá—line numbers!

[edit]
Change Visual Studio Options
The grid layout settings are found on the Visual Studio 2005 Options dialog box. To access the Options dialog box, select the Tools / Options… menus. It is the same in the Visual Studio Express Editions.
[edit]
Check Line numbers
* Expand the Text Editor item in the left panel of the Options dialog box.
* Select the C# item.
* Enable source code line numbering by checking the Line numbers checkbox in the Display section of the right panel. Click the OK button and voilá—line numbers!

Visual Studio: Turn off snap lines
Snap lines were introduced with Visual Studio 2005. They are used to faciliate the positioning of elements on Windows Forms. But, snap lines can be disabled if you prefer the snap to grid layout style of Visual Studio 2003.
[edit]
Change Visual Studio Options
The grid layout settings are found on the Visual Studio 2005 Options dialog box. To access the Options dialog box, select the Tools / Options… menus. It is the same in the Visual Studio Express Editions.
[edit]
Check Show all settings
If you do not see the Windows Forms Designer item in the left panel of the Options dialog box—only Environment, Text Editor, and Debugging are viewable—, look for the Show all settings checkbox at the bottom left of the Options dialog. Check it to make the other settings viewable.
[edit]
Select SnapToGrid
* Now, in the left panel, expand the Windows Forms Designer by clicking on the plus (+) sign to expose the General item. Click the General item to display the general options in the right panel.
* If necessary, expand the Layout Settings item by by clicking on the plus (+) sign next to it.
* Select LayoutMode. Then, from the pull down menu, select SnapToGrid. And, click the OK button.
* Finally, exit Visual Studio and restart it for the change to take effect.
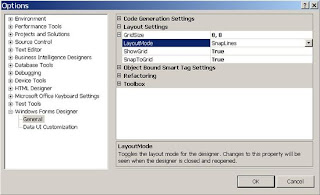
Figure: Visual Studio Layout Settings
[edit]
Change Visual Studio Options
The grid layout settings are found on the Visual Studio 2005 Options dialog box. To access the Options dialog box, select the Tools / Options… menus. It is the same in the Visual Studio Express Editions.
[edit]
Check Show all settings
If you do not see the Windows Forms Designer item in the left panel of the Options dialog box—only Environment, Text Editor, and Debugging are viewable—, look for the Show all settings checkbox at the bottom left of the Options dialog. Check it to make the other settings viewable.
[edit]
Select SnapToGrid
* Now, in the left panel, expand the Windows Forms Designer by clicking on the plus (+) sign to expose the General item. Click the General item to display the general options in the right panel.
* If necessary, expand the Layout Settings item by by clicking on the plus (+) sign next to it.
* Select LayoutMode. Then, from the pull down menu, select SnapToGrid. And, click the OK button.
* Finally, exit Visual Studio and restart it for the change to take effect.

Figure: Visual Studio Layout Settings
Visual Studio: Export and import settings
If you work in Visual Studio on multiple computers or if you share Visual Studio with someone else on the same computer, it is very handy to be able to import your personal Visual Studio settings. It is very disconcerting to work without your personal source code markup, custom keyboard shortcuts, and other personal settings. And, it is nice to have a backup, just in case Visual Studio or an update should lose your personal settings.
Contents
|
Export personal settings
Navigate to the Tools / Import and Export Settings… menus to access the Import and Export Settings Wizard.

Figure 1. Import and Export Settings Wizard
Be sure Export selected environment settings is checked. Then, click the Next button; and, the following screen will be displayed:

Figure 2. Select settings for export
Check off all the settings you wish to export. Then, click the Next button. In the next step, you will provide the name and location for the exported settings.

Figure 3. Enter a name and directory for the exported settings
After entrering the name and location of your settings, click the Finish button. The wizard will export your selected settings. Now, your personal Visual Studio settings are in a file which you can move to another computer and Import.
Import personal settings
Navigate the Tools / Import and Export Settings… menus to the Import and Export Settings Wizard.

Figure 4. Import and Export Settings Wizard
Check Import selected environment settings. Then, click the Next button; and, the following screen will be displayed:

Figure 5. Option to save the current settings
If you wish to save the current Visual Studio settings, check the Yes radio button and enter the name and directory for the settings to be saved. Otherwise, check No. In any case, click the Next button.
Next, you select the settings you wish to import. In this example, the previously exported settings file named Exported-2006-10-23.vssettings is selected.

Figure 6. Select the settings collection to import
Simply, select the individual settings you wish to import from the settings collection on the following screen:

Figure 7. Select indiviudal settings to import
Finally, click the Finish button; and, Visual Studio will import the settings.
Visual Studio: Implementing interfaces
An interface is implemented at class definition level by using the : (colon) operator after the class name but before the interface name. Then, you must provide concrete implementations of the methods of that interface. In Visual Studio, this task is automated for you; so, you do not have to type out all the methods.
Steps:
- Type the classname.
- Type the colon (
:). - Type either
Ctrl+Spaceor begin typing the interface name to bring up the IntelliSense menu. Select the interface name from the menu list. - Right click the interface name and select
Implement Interfacefrom the popup menu.
Figure: Implementing an interface in Visual Studio

Visual Studio: Configure automatic backups
The AutoRecover feature was introduced with Visual Studio 2005. AutoRecover allows you to configure Visual Studio to save your projects and solutions automatically. So, your work can be recovered in the event of a crash.
[edit]
Configure AutoRecover
First, navigate through the Tool / Options… menus to the Options dialog box.
Then, select Environment / AutoRecover in the left panel of the Options dialog box.
Figure: Visual Studio Options Dialog Box
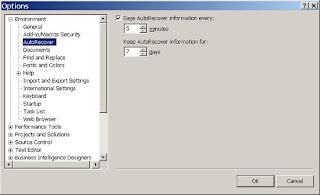
Be sure the Save AutoRecover information every: checkbox is checked.
Now, enter the number of minutes between automatic backups. If you enter 10, Visual Studio will automatically create a backup every ten minutes.
Next, enter the number of days you wish to keep previous backups in the Keep AutoRecover information for: control. If you enter 10, Visual Studio will retain previous backups for ten days.
Finally, click the OK button.
If Visual Studio or the system should crash, then the next time you start up Visual Studio it will prompt you to have Visual Studio automatically restore your project or solution.
Anonymous Methods vs Threads
With the release of .NET Framework 2.0, we have gained access to a very powerful feature called Anonymous Methods. I'm sure that almost any .NET developer has used Anonymous Method at least once and most of us use them on a daily basis.
Typically you use Anonymous Methods when you want to declare an event handler inline, without the need of creating a separate, named method (hence the name Anonymous). Other usage areas include delegates of types such As Predicate or Action. Mentioned delegates are most often used in methods found on all types of collection related classes be it Array or List
string[] urls = GetUrls();

string[] urlWithWww;

urlWithWww = Array.FindAll(urls, delegate(string url)

{

  return url.StartsWith("www");

});
Nothing unusual here. The usefulness of Anonymous Methods comes from the fact that they allow us to access variables defined in the scope in which the very method is defined. Here as an example of how this feature is usually used:
string pattern = ".com";

string[] urls = GetUrls();

string[] urlWithWww;

urlWithWww = Array.FindAll(urls, delegate(string url)

{

  return url.Contains(pattern);

});
Great feature indeed, but there is one gotcha that we have to be aware. The problem most often appears when we start to work with multiple threads. Given the following code:
foreach (string url in urls)

{

  DoSomethingAsync(delegate()

  {

      Debug.WriteLine(url);

  });

}
We have to know that the url variable that we pass to a Debug.WriteLine method is "shared" among all Anonymous Methods and because of this, we may (and most probably we will) get results that we do not expect: same url printed few times, than a different url, again printed few times. Confusing, isn't it?
Why is that? Brad Adams explains the mechanism behind this strange behavior here (scroll down to the comments). It's worth mentioning that you could get the same strange behavior without working with multiple threads. It is just far more common to get it while theading.
To make things more "predictable", the code above has to be written in a slightly different way:
for (int i = 0; i < style="color: rgb(0, 0, 255);">string url = urls[i];

  DoSomething(delegate()

  {

      Debug.WriteLine(url);

  });

}
Now every Anonymous Method gets its own copy of url and everything works as expected.
Visual Studio Code Snippets
There is a feature in Visual Studio 2005 called Code Snippets. Basically what this feature allows you to do is type in a code editor, some special string such as "prop":

And then by pressing the TAB key once (or twice if using the provided intellisense), Visual Studio generates some code for you as on the picture below:

Notice that there are reqions highlited witha green color. You can tab through those regions with a TAB key. On the above example, If you eddit the type of the field, the type of the property is automaticaly updated for you. The same holds true for the field name which is used inside the property.
Visual Studio 2005 comes boundled with a couple of useful code snippets of which I use the "prop" the most. However, If you do mostly ASP.NET applications you know that the standart property with underlying field is not so widely used here. What we need is a property which uses ViewState as a storage medium. Fortunatelly it is very easy to create your own snippets. Just go to the folder where VS is installed - for me it was: "c:\Program Files\Microsoft Visual Studio 8\VC#\Snippets\1033\Visual C#". There you will find all the available snippets. When you look any one of them what you will find is a simple XML defining the snippet behavior. From there it should be no problem to create your own snippets.
Being ASP.NET developer myself I have created few snippets that help me doing my work faster and those are: propv, propvd, props and test. First two generate a property that uses the ViewState, the third one generates a static property and the third one a method that has a Test attribute of an NUnit testing framework. You can download the snippets here: Snippets.zip (2,23 KB). Just put them together with the rest of the snippets.
Hey, Google! There’s Another Programming Language Called Go!

When you’re a huge web company, and you choose a name for something as important as a new programming language, you should take great care to investigate whether the name is already taken.
Apparently, Google () didn’t do that. Frank McCabe, a developer working at San Jose, Calif.-based Starview Technologies, created a programming language and named it Go years ago. In fact, he published a research paper about it in 2004, and devoted an entire book to it, named “Lets Go” in 2007.
In an e-mail to Information Week, McCabe said he doesn’t own a trademark on the language, but he’s not happy about Google choosing the name Go nevertheless. “It takes a lot of effort to produce a reasonably well-designed language. I am concerned that the ‘big guy’ will end up steam-rollering over me. I do not have resources to invest in legal action; but do not intend to let Google keep the name without them being explicit that they are steam-rollering over us,” he says.
If the folks at Google who named the language didn’t know about the other “Go”, they were careless. If they knew about it and decided to name their language “Go” anyway, it sounds like a big company not caring much about the little guy. After all, how many names are taken when it comes to programming languages? Perhaps a couple hundred? Surely Google could have chosen another name.
Google hasn’t given a definitive answer to this problem yet. So far, their spokesman merely said they “recently became aware of the Go! issue and are now looking into the matter further.” But ignoring the issue definitely won’t go well with Google’s oft quoted mantra – “Don’t be evil”.
Subscribe to:
Posts (Atom)